- Published on
Getting A Better Hip Hop Drum Sound
- Author
-
-

- Name
- Posts
- Posts
-
Getting Better Hip Hop Drum Sound
What’s up everybody? Instrumentool here back with another post. Today we’ll cover a few tips to better drums.
Disclaimer:
Remember these are techniques I use, there's no right or wrong way to produce and mix drums. Just know these are things that have helped me and I'm passing on the knowledge so see fit on how you'd like to use it.
Here's a look into the layout of my drums in my mix template. You'll be able understand the techniques later by seeing this first.
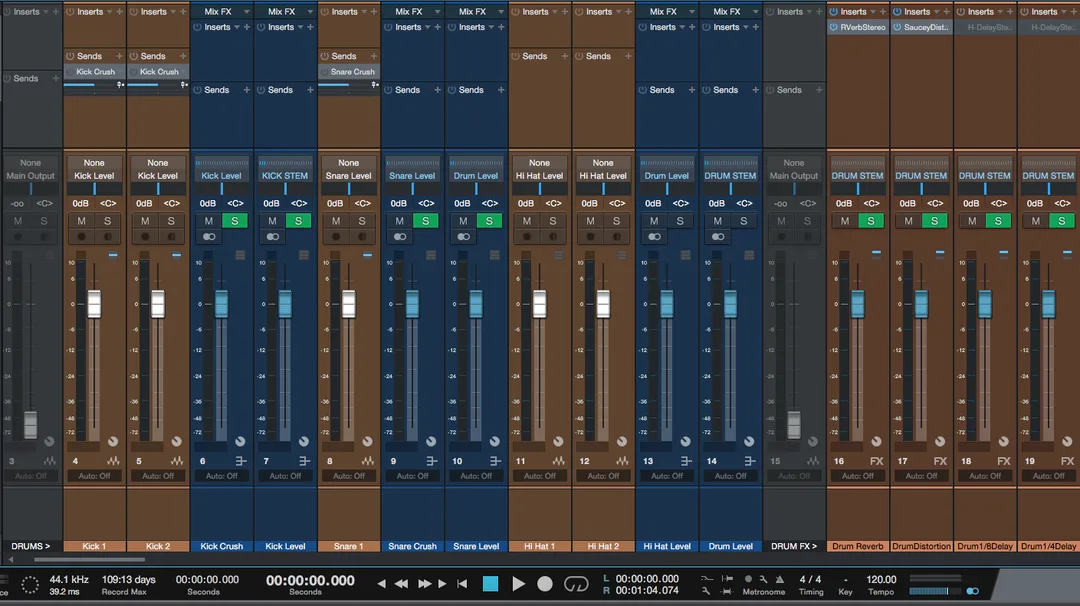
When I'm mixing or producing I prefer my drums to the far left of the DAW I'm working in. Studio One 4 and Reason 9.5 happen to be my weapons of choice. Color coding also plays a big role. When mixing a big session, say 30+ tracks, color coding allows me to instantly know what type of sound a track is.
I tend to group my drums a lot and tend to have a decent amount of routing.
Here's how things are setup:
All kicks meet at a buss named Kick Crush. This is a parallel compression buss that's then fed to a Kick Level buss. This is where are the processing of all the kick drums is done. This works so well when you have multiple kicks and want to process them at the same time.
Ex. Kick 1 & Kick 2 > Kick Crush > Kick Level
All snares meet at a buss named Snare Crush and follow the same type of routing as the kicks are.
Ex. Snare 1 & Snare 2 > Snare Crush > Snare Level
Next is hi hats. Same hoopla as stated above, minus the parallel compression. I usually leave that to kicks and snares only.
All those tracks are then routed to a Drum Level buss where any further processing or leveling is done. It may seem like overkill but I love the flexibility.
There's a few basics we have to cover first in order to get great drum mixes:
Sound Selection
When making beats, I'm on the hunt to find the perfect drums to match the song's mood, swing, tempo, etc. This part is so critical to the end sound of your drums. ALWAYS use the best sounds you can. Don't go choosing a wimpy 808 when you have a track that's powerful and punchy. Go for sounds that fit and feel right, trust it'll go a long way.
Layering
Another simple technique I use time and time again is layering. Especially with kicks and snares. I'll stack 3 different kicks or snares to make the ultimate blend. The key here is finding sounds (first step aye?) that mesh well. Makes no sense to layer just to layer. Be smart about it young Jedi.
Panning
Simply put, panning is the spread of a signal in a stereo or multi-channel sound field. You can place a sound anywhere from far left to center to far right and anywhere in between. Be sure to place some if not all your drum sounds in their own space.
For example 9 times out of 10 I'm placing my kicks and snares in the middle of the stereo field. Sometimes I may nudge the panning slightly to the left or right, but not too much. It depends on what the mix calls for at the time.
Hi hats and other percussion sounds (shakers, congas, triangles, etc.) can be panned flexibly as they don’t disrupt the balance too much.
Velocity
To make my drums feel more "live" and not programmed, I use velocity (or volume) changes to my advantage.
Below is a screenshot of what I mean. The hi hats here aren't hitting at a constant level. They're varied throughout the track.
I tend to group my drums a lot and tend to have a decent amount of routing.
Here's how things are setup:
All kicks meet at a buss named Kick Crush. This is a parallel compression buss that's then fed to a Kick Level buss. This is where are the processing of all the kick drums is done. This works so well when you have multiple kicks and want to process them at the same time.
Ex. Kick 1 & Kick 2 > Kick Crush > Kick Level
All snares meet at a buss named Snare Crush and follow the same type of routing as the kicks are.
Ex. Snare 1 & Snare 2 > Snare Crush > Snare Level
Next is hi hats. Same hoopla as stated above, minus the parallel compression. I usually leave that to kicks and snares only.
All those tracks are then routed to a Drum Level buss where any further processing or leveling is done. It may seem like overkill but I love the flexibility.
There's a few basics we have to cover first in order to get great drum mixes:
- Sound selection
- Layering
- Panning
- Velocity
- Automation
- EQ
Sound Selection
When making beats, I'm on the hunt to find the perfect drums to match the song's mood, swing, tempo, etc. This part is so critical to the end sound of your drums. ALWAYS use the best sounds you can. Don't go choosing a wimpy 808 when you have a track that's powerful and punchy. Go for sounds that fit and feel right, trust it'll go a long way.
Layering
Another simple technique I use time and time again is layering. Especially with kicks and snares. I'll stack 3 different kicks or snares to make the ultimate blend. The key here is finding sounds (first step aye?) that mesh well. Makes no sense to layer just to layer. Be smart about it young Jedi.
Panning
Simply put, panning is the spread of a signal in a stereo or multi-channel sound field. You can place a sound anywhere from far left to center to far right and anywhere in between. Be sure to place some if not all your drum sounds in their own space.
For example 9 times out of 10 I'm placing my kicks and snares in the middle of the stereo field. Sometimes I may nudge the panning slightly to the left or right, but not too much. It depends on what the mix calls for at the time.
Hi hats and other percussion sounds (shakers, congas, triangles, etc.) can be panned flexibly as they don’t disrupt the balance too much.
Velocity
To make my drums feel more "live" and not programmed, I use velocity (or volume) changes to my advantage.
Below is a screenshot of what I mean. The hi hats here aren't hitting at a constant level. They're varied throughout the track.
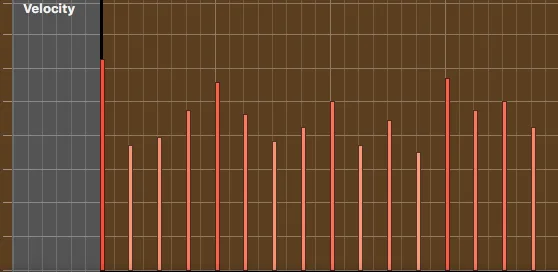
Use velocity to keep your drums sounding fresh, more human like and less robotic.
Automation
"If a mix sits still, it has the potential to lose the listener’s interest."
Automation allows you to program any number of parameters in your mix to happen at defined times. And they can be any of the below things we discussed plus more.
Here's a few things you can automate to give you an idea:
When adding automation, you need to have a reason for it. Don’t add automation because you feel there isn’t enough in your track. Add automation for specific reasons.
EVERY piece of automation should have a purpose.
EQ
Evaluate your mix and identify problematic areas of frequency buildup. This is mostly found in the low end (Kicks, bass, & 808s). EQ is crucial to carving out a place for each drum sound to sit.
How many beats have you made or heard and the 808 and kicks weren't meshing together and sounded like a whole bunch of garbage? Or the musical elements were clashing with the hi hats and it sounds harsh?
The trick here is to stylistically blend elements together or gain clarity and separation with EQ.
Here's an example.
Automation
"If a mix sits still, it has the potential to lose the listener’s interest."
Automation allows you to program any number of parameters in your mix to happen at defined times. And they can be any of the below things we discussed plus more.
Here's a few things you can automate to give you an idea:
- Transitional effects (filters, distortion, reverb)
- Filters (bringing up a filter cutoff quickly)
- Mute/unmute on sounds
When adding automation, you need to have a reason for it. Don’t add automation because you feel there isn’t enough in your track. Add automation for specific reasons.
EVERY piece of automation should have a purpose.
EQ
Evaluate your mix and identify problematic areas of frequency buildup. This is mostly found in the low end (Kicks, bass, & 808s). EQ is crucial to carving out a place for each drum sound to sit.
How many beats have you made or heard and the 808 and kicks weren't meshing together and sounded like a whole bunch of garbage? Or the musical elements were clashing with the hi hats and it sounds harsh?
The trick here is to stylistically blend elements together or gain clarity and separation with EQ.
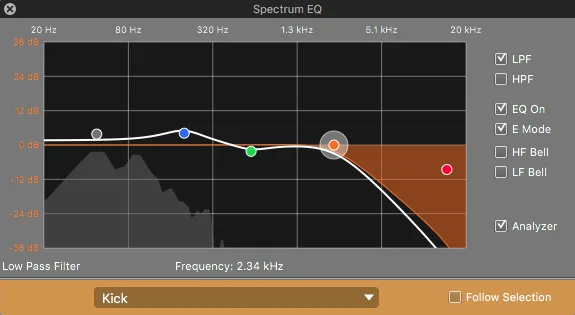
Here's an example.
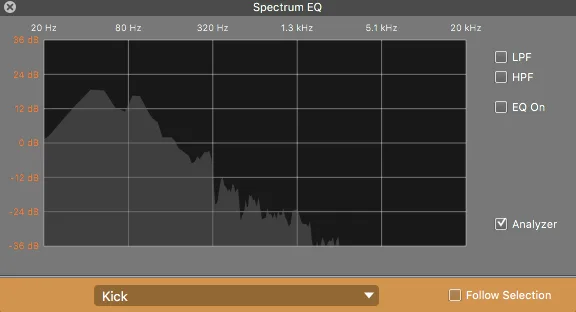
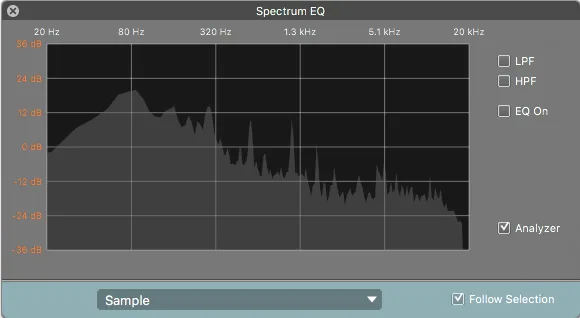
The first 2 pictures are the frequency ranges of a kick and sample in a beat. Notice how they are very similar in the frequency range they cover.
To combat this I chose to use a high pass filter (takes the low frequencies out) on the EQ of the sample to let the low end of the kick come through.
To combat this I chose to use a high pass filter (takes the low frequencies out) on the EQ of the sample to let the low end of the kick come through.
For the kick I also used a filter but a low pass one (takes out the high frequencies) so the sample would have it's dedicated space.
I've added some audio examples so you could hear the differences.
00:00
00:00
No EQ
Doing this allows each element to stand out and you'll say to yourself, "THAT'S the kick or THAT's the snare" because they now have their own space in the mix.
These are a few steps (couldn't give away all the gems lol ) that I take to place my drums on another level. I hope this info helps and feel free to drop me a line here or comment below on any other tips you think could help me or even someone else.
These are a few steps (couldn't give away all the gems lol ) that I take to place my drums on another level. I hope this info helps and feel free to drop me a line here or comment below on any other tips you think could help me or even someone else.
0 Comments